WARNING
Make sure the whole control station is not energized before touching or starting your exercise!
Objectives
This exercise aims to learn about two basic operations with the multimeter:
Measuring voltage
Checking for continuity
Material
Multimeter
AC/DC power supply. Input 120V AC and output 24V DC, 1A (at least)
Push button
What to do
Use the multimeter to check voltage in the AC and DC terminals of the AC/DC power supply
Check continuity in the NC and NO contacts of the push button
How to do it
Step 1.
You need to familiarize yourself with the multimeter. It is a hand held device with two stripes ended in metal tips and are also known as probes or test probes.
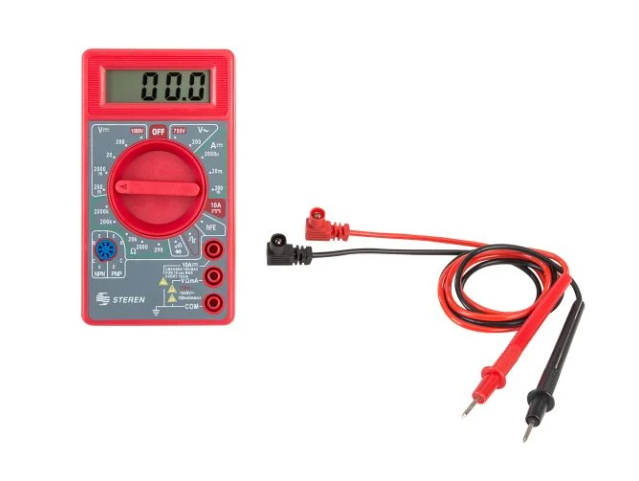 |
| Low cost Steren multimeter |
 |
| Multimeter probe terminal connections detail |
Step 2. AC Voltage measurement.
For this, you need to select the option for alternate current voltage by turning the selector wheel. For this case, choose the option for 200V as shown below:
 |
| AC voltage selection in multimeter |
Next, place the end of one of the probes in the terminal for phase L1 and the other probe in the terminal for neutral where it is expected to have voltage. This connection is made in series.
If everything was done properly a value around 110V should appear in the display.
Step 3. DC Voltage measurement
The procedure is identical to Step 2 but in this case you will have to select the option for 20V DC since we expect to measure around 24 V DC. Probes should remain in the same position. Do as shown:
 |
| DC voltage selection in multimeter |
Important note: Be careful when measuring. You should check that the AC or DC options are correctly selected.
Otherwise, you may damage the multimeter.
Step 4. Checking continuity test
Continuity refers to the current status of a contact so that we may know if it is open or closed.
 |
| Continuity test selection in multimeter |
Keep the probes connected as in step 2 and step 3. Then turn the wheel to select the option with a small speaker symbol. When you place the ends of the probes in terminals of a closed contact the multimeter should emit a beep sound and nothing if the contact were open.
Continue your training with the next exercise
Any question? Write in the comments and I shall try to help.
Other stuff of interest
==========
Ildebrando.

No comments:
Post a Comment